Solis inverters are widely used in solar power systems for their efficiency and reliability. However, like any technical equipment, they can encounter issues that affect their performance. In this blog post, we’ll delve into common Solis inverter problems, explain relevant technical terms, and offer troubleshooting tips to ensure your solar power system operates smoothly.
What is a Solis Inverter?
A Solis inverter converts the direct current (DC) generated by solar panels into alternating current (AC) that can be used by household appliances or fed into the power grid. These inverters are integral to the functioning of solar photovoltaic (PV) systems, making it essential to understand how they work and how to address potential issues.
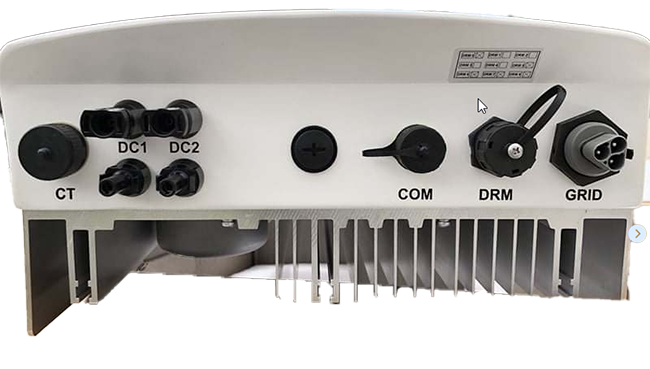
it’s crucial to have a basic understanding of your Solis inverter’s components and functions. Solis inverters are designed to convert the direct current (DC) generated by your solar panels into alternating current (AC) that can be used by your home or fed back into the grid. Key components include:
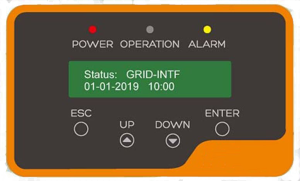
- LCD Display: Provides real-time data and error codes.
- LED Indicators: Show the operational status of the inverter.
- DC Input Terminals: Connects the solar panels to the inverter.
- AC Output Terminals: Connects the inverter to your home’s electrical system.
Common Solis Inverter Problems
Here are some of the most common problems that you might face with your Solis Inverter system.
Solis Inverter Error Codes
Read the following Error codes as they may help you while having any problem with your Solis Inverters

E01: Grid Voltage Error
Meaning: This error indicates that the grid voltage is outside the acceptable range.
Solution: Verify grid voltage using a multimeter. Ensure inverter voltage settings match local grid standards. Contact utility provider if needed.
E02: Grid Frequency Error
Meaning: This error suggests that the grid frequency is not within the acceptable limits.
Solution: Check grid frequency with a frequency meter. Ensure inverter settings are configured for local grid frequency. Consult utility provider if issue continues.
E03: Grid Impedance Error
Meaning: This error occurs when the grid impedance is too high or too low.
Solution: Measure grid impedance using appropriate equipment. Ensure all connections are secure and free from corrosion. If necessary, contact your utility provider for further investigation.
E04: Temperature Sensor Error
Meaning: This error indicates a malfunction in the temperature sensor.
Solution: Inspect the temperature sensor for any visible damage or disconnection. Restart the inverter to see if the error clears. Replace the temperature sensor or contact a qualified technician if the problem persists.
E05: DC Overcurrent
Meaning: This error indicates that the DC input current has exceeded the inverter’s capacity.
Solution: Inspect the solar panel configuration and ensure it adheres to the inverter’s specifications. Check all DC connections for damage or loose wires.
E06: AC Overcurrent
Meaning: This error suggests that the AC output current is too high.
Solution: Verify the load connected to the inverter and ensure it does not exceed the inverter’s maximum output current. Inspect AC connections for any faults.
E07: DC Bus Overvoltage
Meaning: This error occurs when the DC bus voltage exceeds the allowable limit.
Solution: Check the solar panel voltage and ensure it is within the inverter’s specifications. Inspect the DC bus components for any faults.
E08: DC Bus Undervoltage
Meaning: This error indicates that the DC bus voltage is below the minimum limit.
Solution: Ensure the solar panels are generating sufficient voltage. Check for any shading or damage to the panels and verify all DC connections.
E09: Inverter Overload
Meaning: This error suggests the inverter is overloaded beyond its capacity.
Solution: Reduce the load connected to the inverter. Ensure the total load does not exceed the inverter’s rated capacity.
E10: Inverter Underload
Meaning: This error occurs when the load on the inverter is too low.
Solution: Increase the load connected to the inverter to ensure it operates within its optimal load range.
E11: Internal Communication Failure
Meaning: This error indicates a failure in the internal communication between the inverter’s components.
Solution: Restart the inverter. If the error persists, contact the manufacturer for further assistance.
E12: Fan Failure
Meaning: This error suggests that the cooling fan is not operating correctly.
Solution: Inspect the cooling fan for any obstructions or damage. Clean the fan and ensure it is connected properly. Replace the fan if necessary.
E13: EEPROM Error
Meaning: This error indicates an issue with the EEPROM memory.
Solution: Restart the inverter. If the error remains, the EEPROM may need to be reprogrammed or replaced by a qualified technician.
E14: Isolation Fault
Meaning: This error suggests a fault in the electrical isolation of the inverter.
Solution: Inspect all connections and ensure they are properly insulated. Use an isolation tester to identify and correct the fault.
E15: Ground Fault
Meaning: This error indicates an unintended connection between the system and the ground.
Solution: Check all wiring for any signs of damage or wear. Use a ground fault detector to locate the issue and repair or replace the affected components.
Each code has a unique meaning. Users should refer to the manual for detailed Alarm code explanations.
Grid Voltage Issues
Overvoltage occurs when the voltage exceeds the inverter’s operational limits, potentially damaging the system. Under voltage happens when the voltage drops below the required level, causing the inverter to shut down or perform inefficiently. Grid voltage refers to the voltage level from the power grid to which the inverter must synchronize. Fluctuations in grid voltage can cause operational issues.
DC Voltage Problems
DC bus voltage is the internal voltage level maintained within the inverter. Issues with DC bus voltage can lead to inefficient power conversion. PV isolation protection is a safety feature that detects insulation failures between the PV array and the ground, potentially shutting down the inverter. A DC INTF alarm indicates a direct current interface fault, often related to wiring or connection issues on the DC side of the system.
Solis Communication Errors
Communication errors with a Solis inverter can significantly impact the performance and monitoring of your solar power system. These errors often manifest as issues with data exchange between the inverter and monitoring systems, and can affect the charging and discharging of the battery.
Solis Can Com Fail issue
One common issue is a communication problem that prevents the battery from charging properly. This can be indicated by error messages such as “can com fail” and “un vbat error” on the Solis Cloud app. These errors may be caused by faulty communication cables, such as a CAN cable, or incorrect battery voltage settings.
In some cases, current leakage or battery under voltage settings might be the culprit, leading to battery discharge and failure to recharge from the solar panel. The system might show continuous battery discharge due to these issues, preventing efficient energy storage and utilization.
Another potential cause of communication errors is battery failure, which can prevent the system from functioning correctly. Faulty batteries or battery discharge issues can lead to significant performance drops in your solar power system.
To troubleshoot communication errors, start by checking the CAN cable for any signs of damage or loose connections. Ensure all connections are secure and that the cables are in good condition. Verify the battery voltage settings to ensure they are within the appropriate range.
Soft Run Problem
The delay in Solis inverter startup means the inverter is taking too much time to start which is called Solis soft run problem
If the problem persists, consider replacing faulty batteries and ensuring the system components are compatible with each other.
Regular monitoring through the Solis Cloud app can help identify these issues early, allowing for timely maintenance and repairs. Keeping your system updated with the latest firmware can also prevent many communication-related problems.
Solis cloud app not updating
But sometimes, things don’t go as planned. Your Solis Cloud app is not updating, and that’s super frustrating! 😤 Here are some common culprits:
Internet Connection Problems
Ever tried calling a friend when you have no signal? Updating an app is like that. If your internet isn’t working well, the update won’t either. 📶
Device Storage Woes
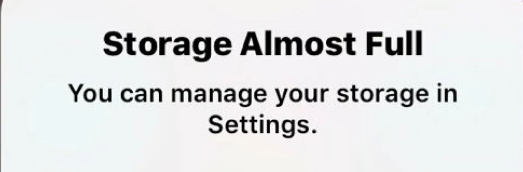
Your phone needs space to download updates. If it’s full of photos, videos, and apps, there’s no room left for updates. It’s like trying to fit a new toy in an already packed toy box.
App Store Troubles
Sometimes the problem isn’t with your device or the app, but with the app store itself. Maybe it’s having a bad day. We all have those, right? 😅
Software Compatibility
Apps need to play nicely with your device’s operating system. If your phone’s software is outdated, the app update might not work. It’s like trying to fit a square peg in a round hole. 🧩
Some apps need specific OS versions. Check if your phone meets these requirements. If not, that might be the issue. 📋
Step-by-Step Guide to Fixing Update Problems
- Check your internet connection.
- Free up some storage.
- Update your app store.
- Reinstall the Solis Cloud app.
- Update your phone’s OS.
Easy peasy, right? 😎
Solis Inverter Overheating Problem
Thermal management ensures the inverter operates within safe temperature ranges. Overheating can lead to thermal shutdowns. The ingress protection (IP) rating indicates the inverter’s resistance to dust and water. Inadequate protection can lead to environmental damage.
How Does Overheating Happen?
Heat and Inverters: A Love-Hate Relationship
Our Solis Inverter works hard to keep our home powered, and working hard means it can get warm. But too much warmth? That’s a no-no!
Where Does All That Heat Come From?
Well, when the inverter converts energy, it produces some heat. Think of it like running around on a sunny day – you get hot, right? That’s the inverter working out! 🏃♂️🔥
Signs Your Inverter is Too Hot to Handle
How do we know if our inverter is overheating? Here are some clues:
- It’s HOT to the touch! 🥵
- It makes strange noises.
- It shuts down randomly.
- It shows error messages.
If you see any of these signs, your inverter might be crying for help!
Common Reasons for Overheating
Poor Ventilation
Imagine being stuck in a stuffy room with no windows open. Yuck! Inverters need fresh air too. If they’re in a cramped space, they can’t breathe.
Dust and Dirt
Dust bunnies are cute, but not in your inverter! Dust can block airflow and make your inverter too hot.
Overloading the Inverter
If we ask our inverter to do too much, it gets overwhelmed, just like we do when we try to carry too many groceries at once. 😅
Direct Sunlight
Inverters are like us – they need shade. Too much sun can make them overheat.
Firmware and Software Issues
Firmware updates are necessary to fix bugs and improve performance. Outdated firmware can lead to compatibility and operational issues. Remote configuration allows technicians to adjust settings and troubleshoot issues from afar. Communication errors can make remote configuration challenging.
Read to know about your Solis Inverter Firmware version list and update it.
Safety and Compliance
AFCI alarm troubleshooting involves addressing Arc Fault Circuit Interrupter (AFCI) alarms that indicate potential electrical arcing faults, which can be hazardous. Arc fault alarm troubleshooting includes identifying and resolving issues causing arc fault alarms, often through inspecting wiring and connections. MLRSD compatibility ensures compatibility with Module Level Rapid Shutdown Devices, which are required for rapid shutdown of solar modules in emergencies.
Basic Troubleshooting For Solis Inverter Problems
Here are some of the common troubleshooting processes which may help you when your Solis inverter is not working
Inverter Not Powering On
One of the most common issues users face is the inverter not powering on. This problem can stem from various sources, including power supply issues or internal faults.
- Check the Power Supply: Ensure that the inverter is properly connected to the power source. Verify that there is no interruption in the power supply and that all connections are secure.
- Inspect the Circuit Breaker: If the circuit breaker has tripped, reset it. Frequent tripping may indicate an underlying issue that needs further investigation.
- Examine the DC Switch: Make sure the DC switch is in the ‘ON’ position. If it is off, turn it on and observe if the inverter powers up.
Low or No Power Output
When the inverter shows low or no power output, it could be due to issues with the solar panels, wiring, or the inverter itself.
- Check Solar Panel Connections: Ensure all solar panel connections are secure and free from damage. Loose or damaged connections can lead to low power output.
- Inspect the Panels: Dirt, debris, or shading on the solar panels can significantly reduce their efficiency. Clean the panels and ensure they are free from obstructions.
- Monitor the Weather Conditions: Overcast weather or insufficient sunlight can temporarily reduce power output. Monitor the system performance during peak sunlight hours for accurate assessment.
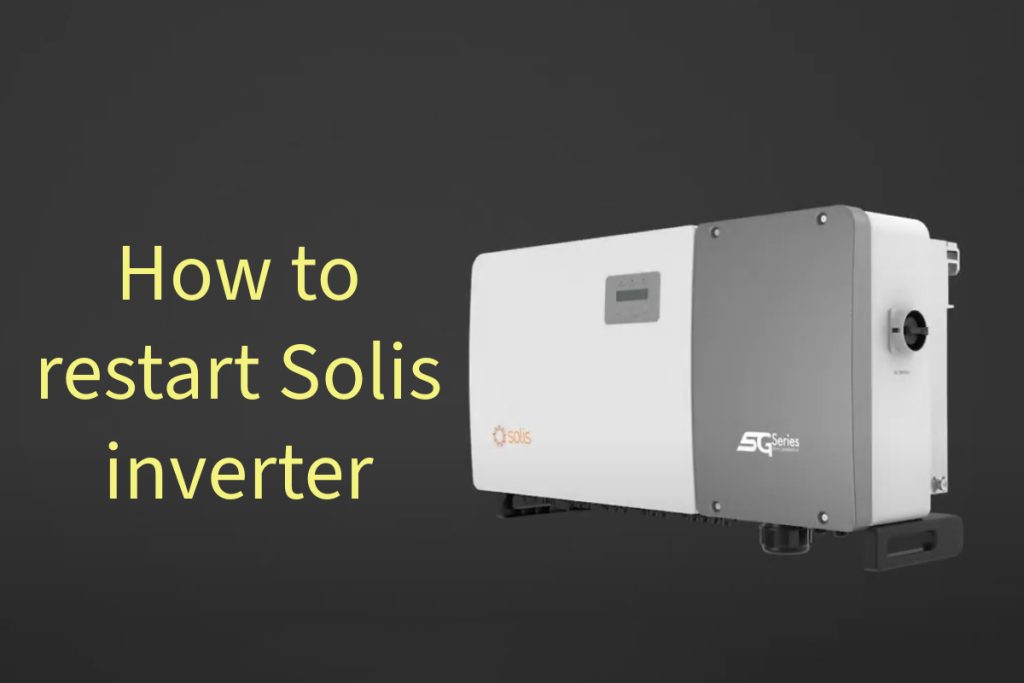
Reset Procedures
Occasionally, your Solis inverter may just need a fresh start. Performing a reset to Solis Inverter is easy and can clear many minor glitches. Follow these steps:
- Turn off the AC and DC disconnects near your inverter.
- Wait for approximately five minutes.
- Turn the DC disconnect back on first.
- Follow by turning on the AC disconnect.
Check your inverter’s display to ensure normal operation has resumed.
Overheating Issues
Inverters can overheat due to environmental factors or internal malfunctions, leading to reduced efficiency or shutdowns.
- Ensure Proper Ventilation: Inverters require adequate ventilation to dissipate heat. Ensure that the inverter is installed in a well-ventilated area and that the vents are not obstructed.
- Check for Dust and Debris: Dust accumulation can impede heat dissipation. Regularly clean the inverter and surrounding area to prevent overheating.
- Monitor Ambient Temperature: High ambient temperatures can contribute to overheating. Consider installing the inverter in a cooler location or providing additional cooling mechanisms.
Ground Faults
Ground faults occur when there is an unintended connection between the electrical system and the ground, which can be hazardous.
- Inspect Wiring: Check all wiring connections for any signs of damage or wear. Repair or replace any faulty wires immediately.
- Use a Ground Fault Detector: Utilize a ground fault detector to identify the exact location of the fault. This tool can help you pinpoint and address the issue more efficiently.
- Consult a Professional: If you are unable to resolve the ground fault, it is advisable to seek assistance from a qualified electrician to ensure safety and compliance with regulations.
Ensuring Proper Communication
Verify all communication cables, including AC cables and RS485 cables, are securely connected and undamaged. Update the inverter’s firmware to the latest version to fix potential bugs affecting communication protocols.
Maintaining Optimal Operating Conditions
Install the inverter in a well-ventilated area to prevent overheating. Regularly clean and inspect the inverter to maintain its IP rating and prevent dust and water ingress. Ensure the inverter installation is done according to manufacturer guidelines to prevent installation-related issues.
Regular Monitoring and Maintenance
Utilize remote monitoring systems to keep track of inverter performance and receive alerts for any issues. Schedule regular maintenance checks to ensure all components are functioning correctly and replace any worn-out parts. Familiarize yourself with general troubleshooting procedures to handle common issues effectively.
Conclusion
Understanding the common problems associated with Solis inverters and knowing how to troubleshoot them is crucial for maintaining the efficiency and longevity of your solar power system. Regular monitoring, timely maintenance, and staying updated with firmware can prevent many issues and ensure your system runs smoothly. For persistent or complex issues, consulting with a professional technician is always recommended to avoid any potential damage to your solar power setup.
By being proactive and informed, you can ensure that your Solis inverter continues to convert solar energy efficiently, contributing to a reliable and sustainable energy solution for your home or business.