In today’s connected world, having your Solis inverter’s WiFi up and running is crucial for monitoring your solar energy system’s performance. When your Solis WiFi is not connecting, it can be frustrating and potentially disruptive. This comprehensive guide provides detailed steps and solutions to resolve connectivity issues effectively.
Why do My SOLIS WiFi Not Connecting
Before diving into troubleshooting, it’s essential to understand how Solis inverter WiFi works. Solis inverters connect to the internet via WiFi to transmit data to monitoring platforms, allowing users to track energy production and system performance in real-time. If the connection fails, it could be due to various reasons, from router settings to hardware issues.
Several factors can cause your Solis inverter to lose WiFi connectivity. Identifying these common issues is the first step toward resolving them:
1. Weak WiFi Signal
A weak WiFi signal is one of the most common reasons for connectivity problems. If your inverter is too far from the router, the signal may be too weak to maintain a stable connection.
2. Incorrect WiFi Password
Entering the wrong WiFi password can prevent your Solis inverter from connecting to the network. Double-check the password to ensure it is correct.
3. Router Settings
Certain router settings, such as firewalls, MAC address filtering, or incompatible encryption types, can interfere with the connection.
4. Firmware Issues
Outdated firmware on either the Solis inverter or the router can cause compatibility issues, leading to connection problems.
5. Interference
Other electronic devices and networks in the vicinity can cause interference, disrupting the WiFi signal to your inverter.
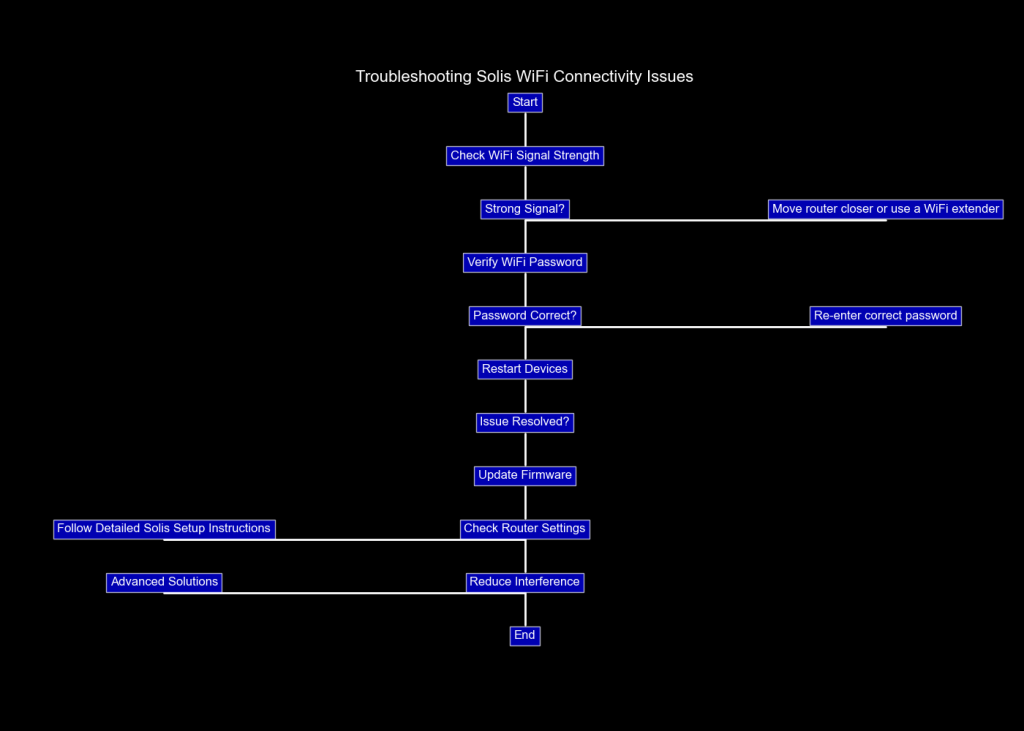
Step-by-Step Troubleshooting Guide
Follow these steps to diagnose and fix Solis WiFi connectivity issues:
Step 1: Check WiFi Signal Strength
Ensure that your Solis inverter is within the range of your WiFi router. You can check the signal strength using a smartphone or a WiFi analyzer app. If the signal is weak, consider moving the router closer to the inverter or using a WiFi extender.
Step 2: Verify WiFi Password
Double-check the WiFi password entered into the Solis inverter settings. A single incorrect character can prevent the connection.
Step 3: Restart Devices
Restart both your WiFi router and Solis inverter. Power cycling these devices can often resolve temporary connectivity issues.
Step 4: Update Firmware & Apps
Ensure that both your Solis inverter and router have the latest firmware updates. Check the manufacturer’s website for the latest versions and follow the instructions to update. Lastly, make sure that you have updated the Solis cloud app to the latest version. If any issue persist with updating then check out why Solis app isn’t updating
Step 5: Check Router Settings
Review your router settings to ensure they are compatible with the Solis inverter:
- Disable MAC Address Filtering: If enabled, add the inverter’s MAC address to the allowed list.
- Adjust Firewall Settings: Temporarily lower firewall settings to see if it resolves the issue.
- Change WiFi Channel: Try changing the WiFi channel to reduce interference from other devices.
Step 6: Reduce Interference
Move other electronic devices away from the router and inverter to minimize interference. Additionally, ensure that your WiFi network is operating on a less crowded frequency band.
Detailed Instructions from Solis WiFi Setup Guide
Based on the Solis WiFi instructions, follow these specific steps to ensure proper setup:
Step 1: Ensure Proper Dongle Insertion
Make sure the WiFi dongle is correctly inserted into the inverter and that you have access to a laptop or PC connected to the home WiFi network.
Step 2: Connect to the Inverter’s WiFi Network
On a Windows PC or laptop, go to the WiFi settings and select the network that appears as AP_XXXXXXXX. Connect to this network.
Step 3: Access Inverter Settings via Browser
Open Google Chrome or Firefox and enter the IP address 10.10.100.254 into the URL bar. If prompted for a username and password, enter admin for both fields and sign in.
Step 4: Use the Setup Wizard
Select the “Wizard” option. Find and select your home WiFi network (e.g., Telstra or DODO). If your network does not appear, press “Refresh.”
- Check RSSI Value: Ensure the RSSI value is more than 30. If not, adjust the router’s position.
Step 5: Enter WiFi Password
Click on “Show password” to avoid typing errors, then enter the WiFi password and proceed.
Step 6: Complete the Setup
Follow the prompts, and click “Next” until you reach the final setup screen. Click “OK” and wait for the confirmation page indicating a successful connection. If the setup fails, refresh the page and repeat the process.
Advanced Solutions
If the basic troubleshooting steps do not resolve the issue, consider these advanced solutions:
Reconfigure Network Settings
Reset the network settings on your Solis inverter and reconfigure them from scratch. This process can clear any incorrect settings that might be causing the issue.
Use a Static IP Address
Assigning a static IP address to your Solis inverter can sometimes resolve connectivity issues. Consult your router’s manual for instructions on how to set up a static IP.
Check for Hardware Issues
In rare cases, the problem might be with the hardware itself. Inspect the inverter and the WiFi module for any visible damage. If you suspect a hardware issue, contact Solis customer support for assistance.
Preventive Measures
To avoid future connectivity issues, consider the following preventive measures:
Regular Firmware Updates
Keep your Solis inverter and router firmware up to date to ensure compatibility and security.
Optimal Router Placement
Place your router in a central location, free from obstructions and electronic interference, to ensure a strong and stable WiFi signal.
Monitor Connection Regularly
Regularly check the WiFi connection status of your Solis inverter through the monitoring platform to catch any issues early.
Conclusion
Solis WiFi connectivity issues can be frustrating, but with systematic troubleshooting and preventive measures, you can ensure a reliable connection. By following the steps outlined in this guide, you can diagnose and resolve common problems, ensuring that your solar energy system operates smoothly and efficiently.